

January 31, 2009
January 30, 2009
Cushion Cover Replacement
This isn't really a tutorial, but I wanted to invite you into my sewing studio to show you how I made a new cover for my dad's lumbar cushion. He uses this in his car and the old cover was falling apart. He couldn't find a replacement to buy, so I offered to make him a new cover. (I'd never made anything like this before but figured I could copy the old one.)
Anyway, here's a step by step to show you what I did - maybe you can use this inspiration to turn a much-loved beat-up item into an ego-boosting craft project.
(Nothing like a successful first attempt to boost the ol' self confidence...)

Supplies, originally uploaded by passitonplates.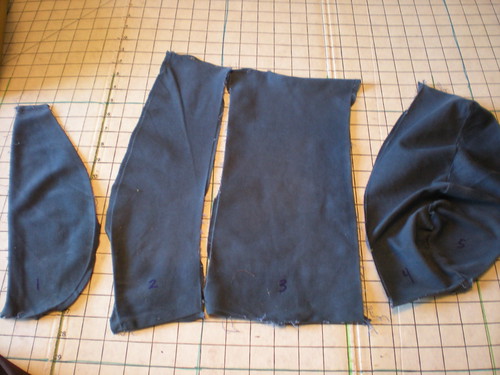
The old cover was methodically disassembled, originally uploaded by passitonplates.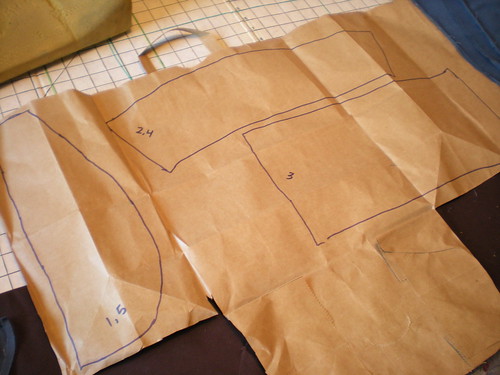
Making the new pattern, originally uploaded by passitonplates.

Laying out the pattern pieces, originally uploaded by passitonplates.
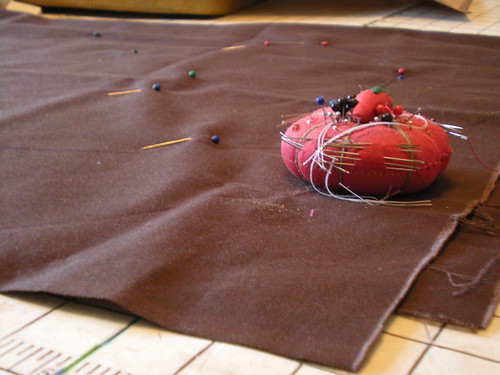
Everything needs to be pinned, originally uploaded by passitonplates.
I wrote notes to myself on the pattern pieces, originally uploaded by passitonplates.
Draw the threads through the eyes, originally uploaded by passitonplates.
Green green, blue blue, darnit. Where are the tweezers?, originally uploaded by passitonplates.
Thread's pulled through. Hope it works!, originally uploaded by passitonplates.
Whew - it chains!, originally uploaded by passitonplates.
Clean and masculine.
Use heavy paper for a stencil, originally uploaded by passitonplates.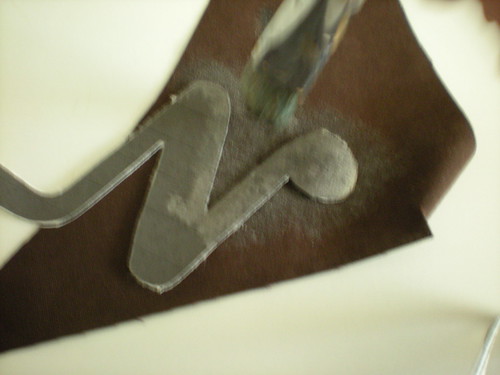
Testing the colors and technique, originally uploaded by passitonplates.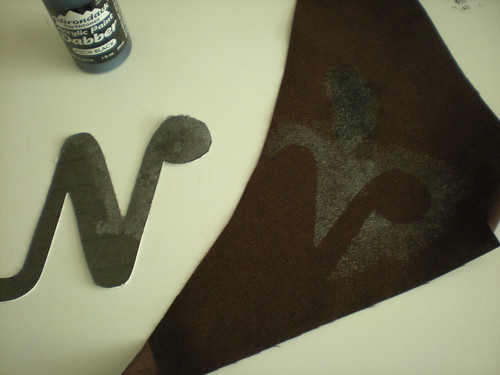
Subtle. That's perfect., originally uploaded by passitonplates.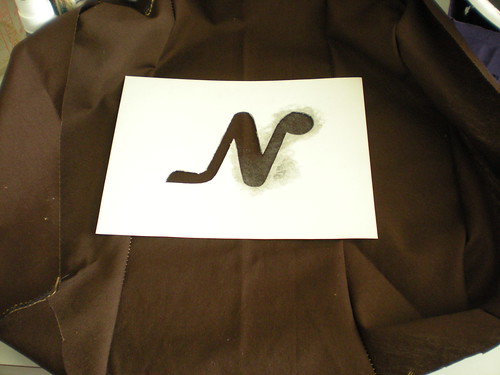
Align the stencil and start dabbing and painting, originally uploaded by passitonplates.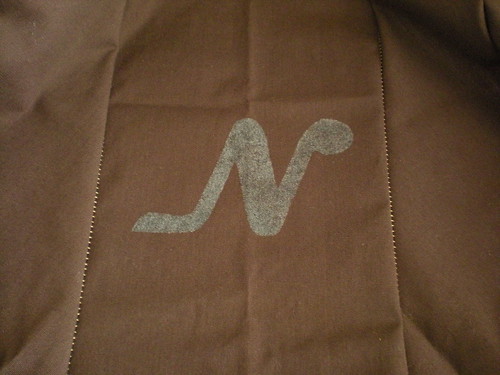
Stencilled "N", originally uploaded by passitonplates..
Anyway, here's a step by step to show you what I did - maybe you can use this inspiration to turn a much-loved beat-up item into an ego-boosting craft project.
(Nothing like a successful first attempt to boost the ol' self confidence...)
Supplies, originally uploaded by passitonplates.
Supplies:
The foam cushion,
the old cover (in blue, upper right),
heavy twill fabric in brown,
paper grocery bags,
a sharpie...
The old cover was methodically disassembled, originally uploaded by passitonplates.
The old cover was methodically disassembled.
Each piece was numbered so I knew how the new pieces needed to be sewn back together.
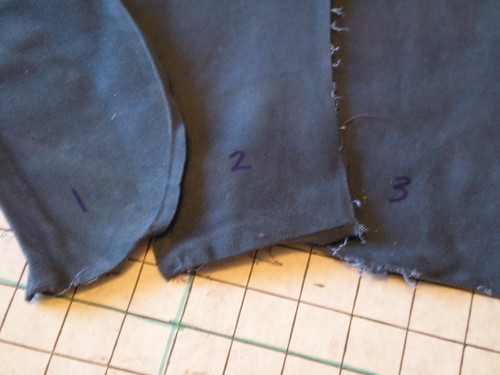
Anal retentive planning: If I didn't number the old pieces as I separated them, I would have ended up with a two-headed giraffe instead of a lumbar seat cushion.
Making the new pattern, originally uploaded by passitonplates.
Making the new pattern:
Each numbered piece was traced onto the grocery bag, then cut out.
Laying out the pattern pieces, originally uploaded by passitonplates.
Laying out the pattern pieces.
Some of the pieces needed to have a little stretch to them to fit nicely around the foam form, so I cut them on the bias. Other pieces were cut straight.
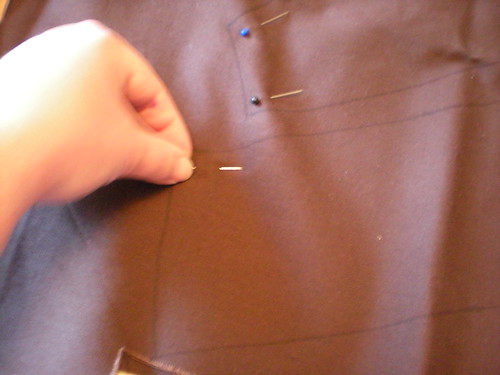
Everything needs to be pinned, originally uploaded by passitonplates.
Everything needs to be pinned.
I'd be frustrated if the fabric slipped while I was cutting it, so I pinned the fabric halves together beforehand.
Ready to cut, originally uploaded by passitonplates.
Ready to cut.
This is the pin cushion my mom used when I was a little kid. She sewed all my clothes when I was in kindergarten and first grade, made all of my many Halloween costumes, taught me how to sew, and helps me figure things out when I get in a jam.
She's the one who came up with the first bonnet-style PlateWrap prototype. Before the round cover with the elastic band, I was working on a quilt-like square thing that wrapped up the plate like it was a baby bunting. It was labor intensive, used a ton of fabric, and would have been priced way beyond reason. Mom's bonnet style cut way down on fabric and labor. Plus they're a lot easier to slip on the plate.
My mom is smart.
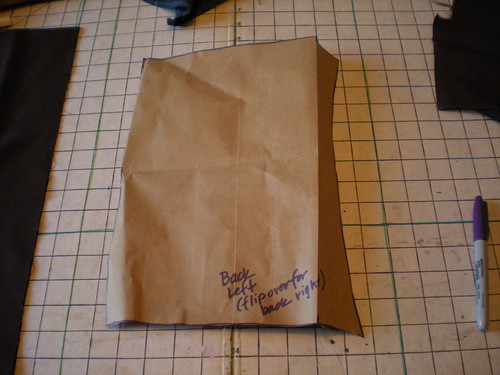
I wrote notes to myself on the pattern pieces, originally uploaded by passitonplates.
I wrote notes to myself on the pattern pieces.
If I hadn't, I would have been so confused when it was time to sew the pieces together.
Changing thread colors, originally uploaded by passitonplates.
When I pulled the serger out, I realized it was threaded with white and beige threads. Better switch the white for black. (I had a limited supply of colors at the moment.)
I know this doesn't have anything to do with the cushioin cover, but since it was part of this particular project, I wanted to show you what I needed to do.
To switch the threads, I snipped the white thread and tied it to the black thread...
I know this doesn't have anything to do with the cushioin cover, but since it was part of this particular project, I wanted to show you what I needed to do.
To switch the threads, I snipped the white thread and tied it to the black thread...
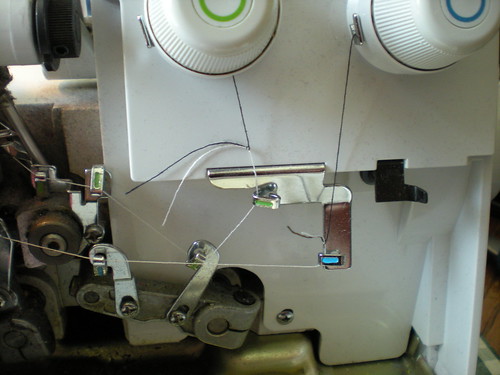
Draw the threads through the eyes, originally uploaded by passitonplates.
Slowly and carefully the threads were pulled though the eyes until they reached the eyes in the upper and lower arms ...
(Only the top two are needles; the bottom two are arms.)
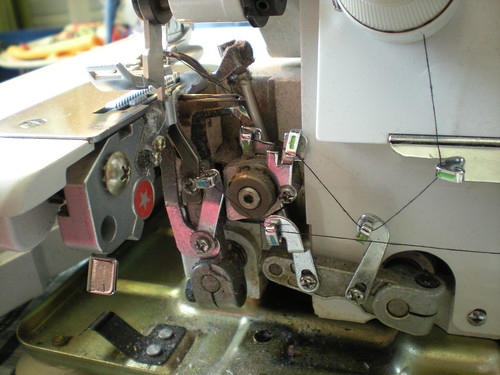
Green green, blue blue, darnit. Where are the tweezers?, originally uploaded by passitonplates.
Green green, blue blue, darnit. Where are the tweezers?
This serger belonged to my very talented step mom, Judy, who quilted and made other beautiful things. When she passed away, my sister Sharon got the serger, but I'm lucky enough to be able to use it for the time being.
Every time I pull it out to use it, I break a thread and have to re-thread the darned thing. After a few failed attempts to get the threads threaded in the right order, I give up and pull out the How-To video that came with the machine. I watch the lady with the long fingernails thread her machine, rewind the tape 10 seconds (so it's ready for the next time I have to re-thread the beast machine,) ... then I go back to the sewing table and successfully re-thread this machine.
I always joke that the only headache Advil can't cure is what you see in this picture.
I now have 14 grey hairs because of this step ...
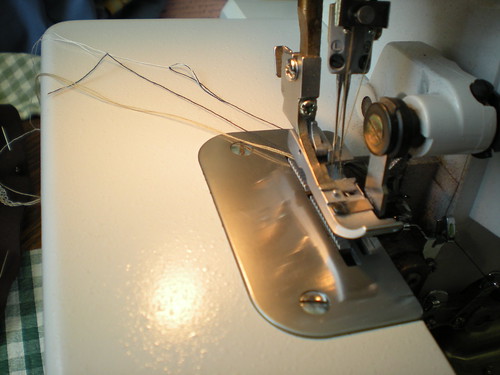
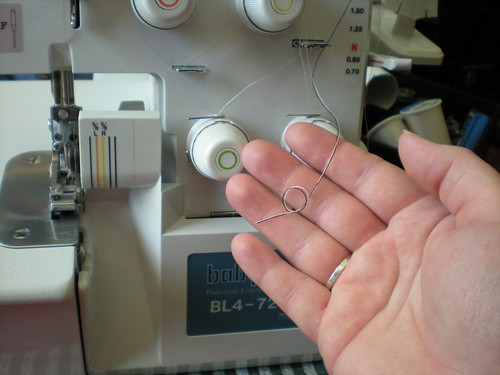
Thread's pulled through. Hope it works!, originally uploaded by passitonplates.
Thread's pulled through. Hope it works!
At this point I need to test to make sure the threads chain as they leave the presser foot. No chain means no stitch. No chain means un-thread everything and start over, trying to thread each color-coded set of eyes in the right order.
No chain means more grey hairs for me. I'm holding my breath as I press down on the pedal... Does it chain?
Whew - it chains!, originally uploaded by passitonplates.
Whew - it chains!
I think that's the first time I got this silly machine threaded right on the first try. (Without watching the video first.)
Probably because you were watching me do it.
Once I started sewing, I decided it needed some kind of embellishment. Since this cushion is my dad's he wouldn't like anything too frou-frou, so I went with a subtle stencilled monogram.
Clean and masculine.
Without any special stencilling supplies, I was able to get a nice image from some heavy paper and craft paint. I just dug into my paper drawer... (Yes, I have a paper drawer. It's full.)
Use heavy paper for a stencil, originally uploaded by passitonplates.
You're going to love how easy it was to make this stencil.
1. I opened up a Word document and found a font I liked. I wanted to make sure it was heavy without a lot of fine detail so it would be easy to cut.
2. After typing the letter I wanted to stencil, I enlarged the font to the size I wanted to use, then test printed it on regular paper.
3. When I had the size just right, I put a sheet of card stock in my printer and printed the letter on it.
4. I couldn't find my exacto knife, so I put the paper on a kitchen cutting board, grabbed a sharp paring knife from the kitchen and traced over the letter outline with the point of the blade. (Is that cheating?)
Testing the colors and technique, originally uploaded by passitonplates.
Now it's time to testing the colors and technique. I used the cut out N on a fabric scrap to make sure everything will turn out the way I see it in my head.
Subtle. That's perfect., originally uploaded by passitonplates.
Subtle. That's perfect.
Align the stencil and start dabbing and painting, originally uploaded by passitonplates.
Next I aligned the stencil and started dabbing and painting. This is just on the front piece. I didn't attach it to the back yet because it needed to lay flat while I painted it.
Stencilled "N", originally uploaded by passitonplates.
Here's the stencilled N.
Next, I sewed the back to the front, turned it right side out, fought to cram the cushion into the cover (quite a snug fit, which is what I wanted) and call dad to let him know it's ready. The tan stitching shows on all the seams, which looks tacky in the photo. When you look at it in person, the stitching actually adds to the charm and makes it look a little more rugged.

Dad loved it.
Did you like this post?
How about subscribing in a reader or by email? It's quick and easy.
.
Tags:
Friday FYI

January 29, 2009
Super Family Fun Day
This past Sunday we all worked together to do the housework then hopped in the car for a long overdue Super Family Fun Day. We had the dog with us and headed to Lincoln City on the Oregon Coast, about an hour west of home.
Along with exploring the winter beach with the tide coming in and encouraging Caesar to chase sea gulls to burn off extra energy, Rachel and I found a very interesting rock while beach combing.
Check this out.
We had a GREAT day. I'll post more pictures soon...
.
Did you like this post?
How about subscribing in a reader or by email? It's quick and easy.
.
Along with exploring the winter beach with the tide coming in and encouraging Caesar to chase sea gulls to burn off extra energy, Rachel and I found a very interesting rock while beach combing.
Check this out.
We had a GREAT day. I'll post more pictures soon...
Did you like this post?
How about subscribing in a reader or by email? It's quick and easy.
.
Tags:
Get to know us
January 28, 2009
Wordless Wednesday - Yaquina Head Lighthouse

Yaquina Head Lighthouse, originally uploaded by Logan Williams.
Did you like this post?
How about subscribing in a reader or by email? It's quick and easy.
.
Tags:
Wordless Wednesday
January 27, 2009
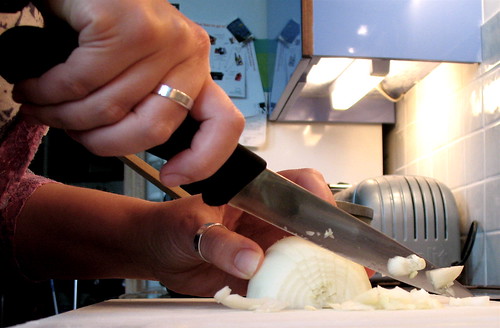
Tuesday Tip - How to peel an onion ...fast
Organized Chefs need to have their basic ingredients prepped ahead of time, so when the rush starts they don't have to waste precious time chopping and slicing and instead they can spend their time getting the food out to their hungry customers fast. They are always in a hurry so they can get everything on their prep list done before the restaurant gets busy.
The other day I asked Mr. Pass It On Plates, a trained chef, how he manages to get onions peeled and chopped so quickly. (I also asked about how to prevent my eyes from watering and he said he hadn't found a solution for that yet. Sorry!)
day 320: look mum, i cooked!, originally uploaded by estherase.
Frank's answer to peeling onions fast was surprisingly simple.
1. Chop off the ends of the onion.
2. With very firm pressure, roll the onion back and forth on the cutting board. Don't worry about bruising the onion. This will loosen the papery skin from the juicy flesh so you can peel the onion quickly.
Since using this trick, I've been able to peel onions in a matter of seconds instead of minutes.
(Of course, in the picture above, you can see the next step to dicing an onion is to cut the onion in one direction, then hold firmly as you slice across the cuts.)
.
Did you like this post?
How about subscribing in a reader or by email? It's quick and easy.
.
Tags:
Tuesday Tips
January 26, 2009
Winter 2009 Calendar of Events
Mark your calendar, follow this blog, or subscribe to our monthly email updates (there's a link on the left) so you don't miss a single event!
Here's what we have planned for the first part of 2009:
january
New Years' Resolution Giveaway
on our Pass It On Plates blog
1/19/09 through 1/24/09
Crafty Tutorial - Cushion Cover Replacement
on our Pass It On Plates blog
1/30/09
~~~~~~~~~~
february
Crafty Tutorial - Gift Box "Remodel"
on our Pass It On Plates blog
2/3/09
Valentines' Giveaway
on our Pass It On Plates blog
2/1/09 through 2/7/09
~~~~~~~~~~
march
Big Green Giveaway
on our Pass It On Plates blog
3/1/09 through 3/7/09
.
Did you like this post?
How about subscribing in a reader or by email? It's quick and easy.
.
Here's what we have planned for the first part of 2009:
january
New Years' Resolution Giveaway
on our Pass It On Plates blog
1/19/09 through 1/24/09
Crafty Tutorial - Cushion Cover Replacement
on our Pass It On Plates blog
1/30/09
~~~~~~~~~~
february
Crafty Tutorial - Gift Box "Remodel"
on our Pass It On Plates blog
2/3/09
Valentines' Giveaway
on our Pass It On Plates blog
2/1/09 through 2/7/09
~~~~~~~~~~
march
Big Green Giveaway
on our Pass It On Plates blog
3/1/09 through 3/7/09
Did you like this post?
How about subscribing in a reader or by email? It's quick and easy.
.
1/27/09 Note: The dates of the giveaways were moved up to earlier dates in their respective months.
Tags:
Special Events
January 21, 2009
Wordless Wednesday - Sunrise over the Coast Range

Sunrise over the Coast Range, originally uploaded by Logan Williams.
♦♦♦♦♦♦
Don't forget...

Click here to enter!
.
Did you like this post?
How about subscribing in a reader or by email? It's quick and easy.
.
Tags:
Wordless Wednesday
January 20, 2009
Tuesday Tip - Baconize your favorite website
You know, I'm generally a very silly person and I've been so serious about things in this blog. I don't know why I've been so serious. Holey moley, almost my 1 year blogiversary and I haven't cracked a single joke.
To break the ice and let you get to know the real me who pads around the house barefoot, speaks in a (lousy) fake French accent, and wishes she had the guts to dye her hair a weird color, I'd like to share a Tuesday tip for general internet silliness.
You can instantly bacon-ize any website if you add this link:
In front of any other URL, such as this: http://bacolicio.us/http://passitonplatesblog.blogspot.com/http://passitonplatesblog.blogspot.com/
My friend Andi and I emailed bazonized sites back and forth to each other.
Here's one:
and *gasp!*
and of course
♦♦♦♦♦♦
Don't forget...
Click here to enter!
.
Did you like this post?
How about subscribing in a reader or by email? It's quick and easy.
.
Tags:
Tuesday Tips
January 18, 2009
New Years' Resolution Giveaway
It's another giveaway! Enter to win a Pass It On Plate Lite with the Candy PlateWrap and the Organza Pouf Doo Dad:
Using the words "Lite" and "Candy" together in the same sentence cancel each other out, don't they? If not, I apologize to all New Years' dieters.
The Rules:
- Enter the giveaway by commenting on this blog post.
- You do not need to have a blog to enter, but your shipping address must be in the US or Canada.
- Leave one comment per entry method. If you are using all three entry methods, you will be leaving 3 comments.
- Giveaway starts Monday Jan 19, 2009 at 12:01pm PST.
- Giveaway ends Saturday Jan 24, 2009 at 11:59pm PST.
- Be sure we have a way to contact you if you win. If not, we will have to select another winner.
- Random.org will help us choose a winner.
How to enter:
+ 1 entry = Leave a comment here with your New Years' Resolution(s). How well are you sticking to it?
+ 1 entry = Sign up for our email newsletter. There is a link in the left sidebar or you can click here. Comment here when you've signed up.
+ 1 entry = Grab our Giveaway badge (below) and blog about it, then comment here with a link to that blog post.
.
How about subscribing in a reader or by email? It's quick and easy.
.
Tags:
Giveaways
January 17, 2009
Sign up for our Newsletter
This year we are putting together a quarterly email newsletter that features Pass It On Plates studio news, entertaining tips, and other information not published in this blog. In the newsletter you will also find exclusive offers and special discounts for you to use in our online store.
If you would like to be on our newsletter mailing list, enter your email address and click GO.
.
Did you like this post?
How about subscribing in a reader or by email? It's quick and easy.
.
If you would like to be on our newsletter mailing list, enter your email address and click GO.
There's a link in the sidebar, too.
Did you like this post?
How about subscribing in a reader or by email? It's quick and easy.
.
Tags:
Studio news
January 16, 2009
Our January Giveaway is coming up on Monday!
Do ya want some candy?

.
Come back on Monday and enter our New Years' Resolution Giveaway!
Did you like this post?
How about subscribing in a reader or by email? It's quick and easy.
.
Tags:
Friday FYI
January 15, 2009
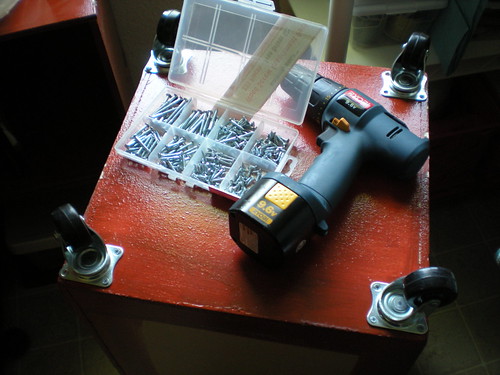
The Cubes

The cubes., originally uploaded by passitonplates.
Here is the "Before" picture.
These cubes used to be some stacking shelf thing that my dad gave to me when we moved to Oregon. We were desperate for furniture, since a lot of our old furniture had to be left behind and was since demolished along with the house. (Long story.)
One day, out of the blue, I decided they'd be a heck of a lot more useful if they could roll around instead of standing stacked up. So I went out and bought casters.
I'd love to add casters to most of my furniture, by the way. I rearrange my rooms a lot. I'm sure I drive my poor hubby crazy with my rearranging.
Oh. If you add casters to anything, one tip: if you want swivel casters, so they can roll in any direction, make sure that ALL FOUR casters swivel. i didn't think about that until I was at the checkout at the hardware store and was lucky I fixed the problem then instead of when I was trying to rolly my cubes around the kitchen later.
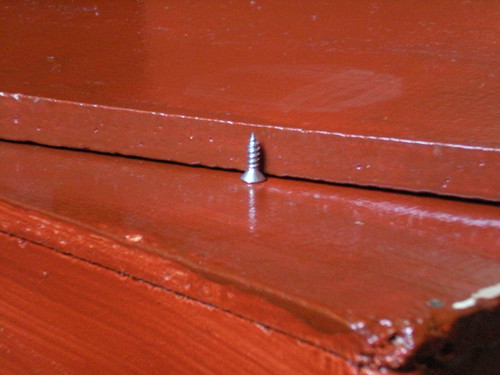
Checking the screw length, originally uploaded by passitonplates.
When it was time to install the casters, I rummaged through my box of screws to find the right length. The screw couldn't be too long or it would snag on whatever I wanted to put in the cube.
Instead of fiddling with a measuring tape, I cheated and eyeballed it. That's good enough for me, it's not rocket science.

Setting the screw, originally uploaded by passitonplates.
The holes were marked with a pencil, then I set each screw by tapping the screwdriver with a hammer. This is particleboard, so no need to pre-drill the holes.

Caster secure, originally uploaded by passitonplates.
Repeat with all four screws, then repeat for each caster.
Easy peasy.
This one's done, originally uploaded by passitonplates.
I only put casters on two of the four cubes. This is the first one, done.
Here are all four cubes. This is in our apartment, when they held kitchen stuff like Frank's big green pot (mmm green pot stew...), his panini press, and the lunch bags. The bottoms held some other appliances and stuff. That was one crowded space, I tell you...

Rollie Cubes (like roll-ee), originally uploaded by passitonplates.
... But I'm a dork. The top cubes are not attached to the bottom cubes, so pushing them around is fun. Especially on carpet. {{sarcasm!!}}
I just can't decide if I want to hinge them or how I want to attach them.
Did you like this post?
How about subscribing in a reader or by email? It's quick and easy.
.
Tags:
Our Creative Lifestyle
January 14, 2009
Wordless Wednesday - Ocean Storm

Ocean storm., originally uploaded by Robert Crum.
Did you like this post?
How about subscribing in a reader or by email? It's quick and easy.
.
Tags:
Wordless Wednesday
January 13, 2009
Tuesday Tip: add a signature to your posts
Hey look at my name at the bottom of this post. That's fairly nice looking, isn't it?
I was bopping around the blogosphere one morning and when reading From Dates to Diapers and Beyond, I noticed Christine had a nice looking signature at the bottom of her post. My first thought was "I want one."
Since I learn more about blogging (and blog bling) by casually visiting other bloggers than by looking for stuff and/or reading about little widgets and gizmos, I looked at her code to see where she got it from and visited the site: MyLiveSignature.com And yes, I put a link to this in my sidebar under "Blog Bling" so you can find it later.
Neat.
I posted info on how to get a signature and install it at the bottom of each of your blog posts in my other blog, Pam Hawk dot com.
For more info on how to get your signature click here.
To learn how to install it in your blog so it shows up at the bottom of every post click here.
.
Did you like this post?
How about subscribing in a reader or by email? It's quick and easy.
.
I was bopping around the blogosphere one morning and when reading From Dates to Diapers and Beyond, I noticed Christine had a nice looking signature at the bottom of her post. My first thought was "I want one."
Since I learn more about blogging (and blog bling) by casually visiting other bloggers than by looking for stuff and/or reading about little widgets and gizmos, I looked at her code to see where she got it from and visited the site: MyLiveSignature.com And yes, I put a link to this in my sidebar under "Blog Bling" so you can find it later.
Neat.
I posted info on how to get a signature and install it at the bottom of each of your blog posts in my other blog, Pam Hawk dot com.
For more info on how to get your signature click here.
To learn how to install it in your blog so it shows up at the bottom of every post click here.
Did you like this post?
How about subscribing in a reader or by email? It's quick and easy.
.
Tags:
Tuesday Tips
January 12, 2009
Our January Giveaway is coming up next week
We're having another giveaway! Next week, starting Monday, you can enter to win a Pass It On Plate Lite with the Candy PlateWrap and the Organza Pouf Doo Dad:
.
Did you like this post?
How about subscribing in a reader or by email? It's quick and easy.
.
Tags:
Special Events
January 9, 2009
Plate Diary Dollars filled 160 bowls of food!
This $5 donation, while small, was matched by Kraft Foods and provided 160 bowls of food to hungry people in the US. That's amazing!
Let's keep those plates moving and see how much more we can donate for January.
Remember, there's no charge for you give a Pass It On Plate to anyone, and you will not be asked to pay anything or donate any money.
Did you like this post?
How about subscribing in a reader or by email? It's quick and easy.
.
Tags:
Plate Diary Dollars
January 8, 2009
The Dizzy Dish
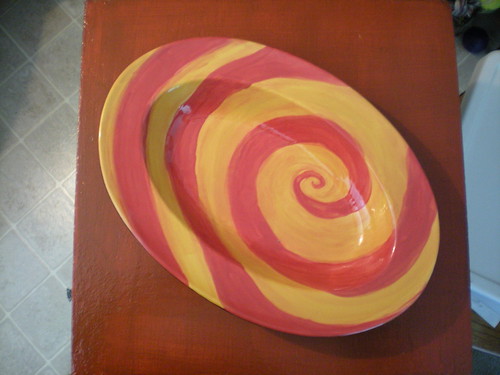
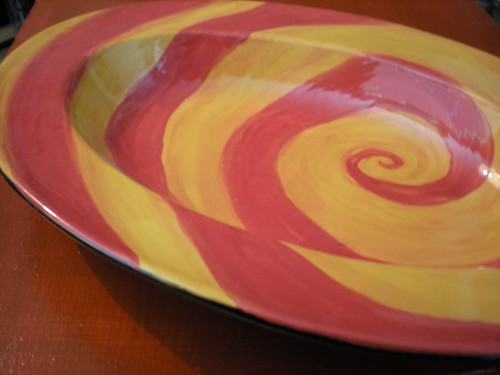
A couple years ago I went to one of those "Paint Your Own Pottery" shops. They had a ladies' night where for just $10 you could have dinner - girl food, of course (shrimp caesar salads) - lots of champagne, and chocolate cake, and paint and giggle and dish until close.
I figured that if I was drinking and painting, there's no point trying to get my lines straight. What I ended up making has been one of my favorite dishes, ever: this is my Dizzy Dish.
.
Did you like this post?
How about subscribing in a reader or by email? It's quick and easy.
.
Tags:
Our Creative Lifestyle
Subscribe to:
Posts (Atom)
