Showing posts with label Tuesday Tips. Show all posts

February 10, 2009

I {Anatomical} Heart You

Happy Valentine's Day to all my dear readers.I {anatomical} heart all of you.

I {anatomical} heart you., originally uploaded by passitonplates.

Last year at my day job, we exchanged valentines. The treat that I brought in last year was pretty well received, so I think I'll make this year a repeat of last year's treat.

First, I went to a restaurant supply store and got narrow poly bags that are food-safe and have a zipper seal. A hundred 3x5 bags were only about $2 and I have a LOT left over. (Incidentally, these are the same type of bags I use when packaging Pass It On Plates Lite.)

Next, I went to the bulk section of my grocery store (I love Winco!) and bought a couple pounds of candy jelly hearts. I poured 1/2c of candy into each bag and zipped it shut.

Last, image was printed on card stock to make a foldover type of card that was stapled over the zipped top of each bag.

It looked great and everyone was talking about it.

So since I did red jelly hearts last year, what kind of candy should I use this year?

(Yes, I'm kind of a dork. I can't do anything normal. (Proud of it, too!) )

February 3, 2009

Tuesday Tip: Gift Box "Remodel"

I bought a pair of earrings for a birthday present, and needed a sturdy box to put them in. At the Dollar Store (of course!) the only small gift boxes they had were for gift cards. Perfect size, yes. Attractive padding or jewelry insert, no. They had an ugly plastic insert that you could clip the gift card into. Yech, that's no good.
After digging through my collection of ribbons and gift wrapping scraps, I came up with what I thought was a very pretty "remodel" for that box. What do you think of this?

Gift card box remodel, originally uploaded by passitonplates.

Here's the original gift card box...

Oh. And I was in a hurry, so this is about 5 minutes of work. Most of that was spent looking for materials: Organza.


This was the ugly ugly ugly gift card holder. And it just looked cheap.


I wrapped a length of organza around the plastic gift card holder twice. This is the organza on a spool that you can get in the wedding department of a fabric/craft store.

Just a little scotch tape holds the organza in place.


Here's what the organza looks like from the front, when the plastic gift card holder is popped back into place.


Here are the earrings in the box. Sorry I couldn't show you the earrings... I'm posting this before I give them away and I don't want to ruin the surprise.


Organza bow, originally uploaded by passitonplates.

I wrapped another length of organza around the box and tied a basic bow (like when you tie your shoes.) The loops on the bow were spread out and fluffed to get this huge pouf.


Don't forget!
Pass It On Plates Giveaway Feb 1-7


.
Did you like this post?
How about subscribing
in a reader or by email? It's quick and easy.
.

January 27, 2009

Tuesday Tip - How to peel an onion ...fast

Organized Chefs need to have their basic ingredients prepped ahead of time, so when the rush starts they don't have to waste precious time chopping and slicing and instead they can spend their time getting the food out to their hungry customers fast. They are always in a hurry so they can get everything on their prep list done before the restaurant gets busy.

The other day I asked Mr. Pass It On Plates, a trained chef, how he manages to get onions peeled and chopped so quickly. (I also asked about how to prevent my eyes from watering and he said he hadn't found a solution for that yet. Sorry!)

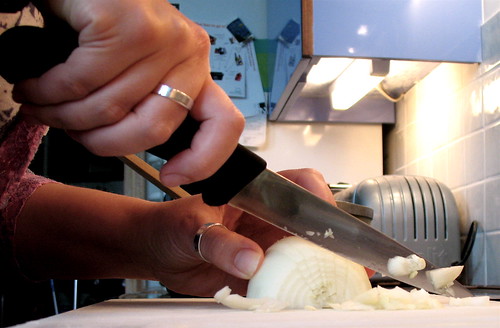
day 320: look mum, i cooked!, originally uploaded by estherase.

Frank's answer to peeling onions fast was surprisingly simple.

1. Chop off the ends of the onion.
2. With very firm pressure, roll the onion back and forth on the cutting board. Don't worry about bruising the onion. This will loosen the papery skin from the juicy flesh so you can peel the onion quickly.

Since using this trick, I've been able to peel onions in a matter of seconds instead of minutes.

(Of course, in the picture above, you can see the next step to dicing an onion is to cut the onion in one direction, then hold firmly as you slice across the cuts.)


.
Did you like this post?
How about subscribing
in a reader or by email? It's quick and easy.
.

January 20, 2009

Tuesday Tip - Baconize your favorite website


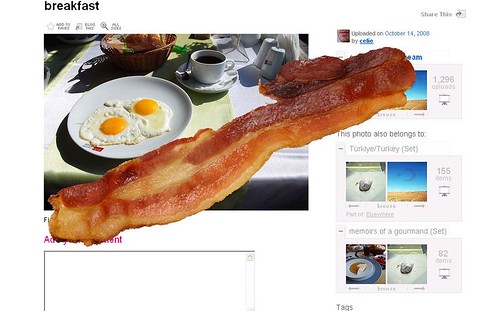
baconized eggs, originally uploaded by passitonplates.
(Thank you to bacolicio.us/ and to celie)

You know, I'm generally a very silly person and I've been so serious about things in this blog. I don't know why I've been so serious. Holey moley, almost my 1 year blogiversary and I haven't cracked a single joke.

To break the ice and let you get to know the real me who pads around the house barefoot, speaks in a (lousy) fake French accent, and wishes she had the guts to dye her hair a weird color, I'd like to share a Tuesday tip for general internet silliness.

You can instantly bacon-ize any website if you add this link:

My friend Andi and I emailed bazonized sites back and forth to each other.
Here's one:

and *gasp!*

and of course


♦♦♦♦♦♦
Don't forget...

Photobucket
Click here to enter!

.

Did you like this post?
How about subscribing
in a reader or by email? It's quick and easy.
.


January 13, 2009

Tuesday Tip: add a signature to your posts

Hey look at my name at the bottom of this post. That's fairly nice looking, isn't it?

I was bopping around the blogosphere one morning
and when reading From Dates to Diapers and Beyond, I noticed Christine had a nice looking signature at the bottom of her post. My first thought was "I want one."

Since I learn more about blogging
(and blog bling) by casually visiting other bloggers than by looking for stuff and/or reading about little widgets and gizmos, I looked at her code to see where she got it from and visited the site: MyLiveSignature.com And yes, I put a link to this in my sidebar under "Blog Bling" so you can find it later.

Neat.

I posted info on how to get a signature and install it at the bottom of each of your blog posts in my other blog, Pam Hawk dot com.

For more info on how to get your signature click here.

To learn how to install it in your blog so it shows up at the bottom of every post click here.


.
Did you like this post?
How about subscribing
in a reader or by email? It's quick and easy.
.

January 6, 2009

Tuesday Tips - (post Christmas) Gift Ideas

My friend was lamenting that her fiancee's birthday is coming up and she doesn't know what to give him. He is interested in fishing and wanted a fishing pole, but since he's left-handed, she thought it would be best if he picked out something that fit him comfortably.
He doesn't yet have a fishing license, so I suggested she buy one for him along with some tackle box stuff. She might just do that.
Do you have a hard to buy birthday gift on your shopping list? I've got several of those, myself, and struggle to get just the right thing each year.
The fishing license idea got me thinking. The license is kind of like the foundation to the gift; you have to have that before you can use anything else. I wonder what other kinds of "foundations" could be given as gifts to support a hobby or interest? Yes, I realize this is just after Christmas, and I'm talking gifts already, but people have birthdays in January.

(Some of my best friends have January birthdays. Hi Deb, Sarah, and Paul!)
Here's a list I made of some ideas.
(Hobby/ foundation gift)
Video gaming/ memory card and rechargeable AA batteries with charger
Video gaming/ book of cheats for popular games
MP3 or iPod user/ great headphones like Skullcandy, Sennheiser, or (insert angelic chorus here) Bose
Digital photography/ (really, the camera would be the foundation, so let's accessorize) a digital picture frame or a Pro account at flickr.
Cooking/ Santoku knives, digital thermometer, bamboo cutting board, gourmet salt
These ideas are based on what I saw people buying and giving as Christmas gifts. I realize they're mostly electronics and that my suggestions are not handmade items.
Flog me with a wet mitten!
I just whipped this up in a hurry.
So.... What would you add to the list?

.

Did you like this post?
How about subscribing
in a reader or by email? It's quick and easy.
.

December 30, 2008

Tuesday Tips 12/30/08 - Another idea for ceramic paint pens

My family had our big Christmas party last weekend. There was a "no gifts" rule between all the grown ups, but as usual, everyone broke the rule. (I hate that rule, anyway. I love giving gifts.) This year I made all home-made items - and had so much fun watching everyone open them that I think I'll do that every year from now on.

One of the gifts was a clay garden pot with a phrase written on it.
I used one of the PIOP (Pass It On Plates) special paint pens on the pot to write:
It's not a houseplant; it's a botanical masterpiece.
There are stars drawn around the outside rim on the saucer.


The pot is in the oven, originally uploaded by passitonplates.

These paint pens are designed for writing on ceramic, pottery, glass, and metal. When the paint is dry, you just pop it in a cold oven, turn the temp to 300F (150C) and once the oven comes up to that temp, set the timer for 30 minutes. When the timer goes off, shut off the oven and let the piece cool down with the oven. At this point, the paint is permanent a food safe.

It may be silly that I baked a garden pot
, but I figured if it was going to be outside in the weather, I didn't want the painted words to be permanent and not wear off from rain or other weather.

For more info about this special paint pen
, you can check out our Paint Pen FAQ.

~~~~~~~~~~~~~~~

I originally planned this post before the family party
, but now there's more to the story that touched everyone. It's a little long, but I just have to tell you what happened from that simple little pot.

This clay garden pot was part of the gift for Friedel
, my Dad's 'friend,' (he never refers to her as his girlfriend but...) Friedel has been a part of our family since she and Dad became an item. We all love her, she loves all of us, and she fits right in. Even my mom, halfway across the country, chats with her on the phone and sends Christmas cards to her. We couldn't be more lucky.

In the pot I added two pairs of leather gardening gloves, a little bottle of Jägermeister (her hometown is Wolfenbüttel, Germany, where they make it, and she loves the flavor - and probably the hallucinogenic qualities?? LOL.) I also included a large river rock upon which I wrote "You Rock!" with an enamel paint pen. We also included a pretty desktop rotating picture frame. Everything was wrapped up into the clay pot and ready for her to open.

It was to be a simple gift for a family member.

It turned out to hold a lot more meaning than originally intended.

When we got to the family gathering, everyone learned that Friedel's daughter didn't send a Christmas gift, card, or make a phone call to wish her a Merry Christmas. Nothing. She said she was crushed for several days then decided that was enough moping and tried to forget about it.

At gift opening time, she opened the pot first. She loved the gloves, she screamed with delight as she saw the Jäger (she didn't know I remembered,) laughed at the rock, and marveled over the pot. Then she started to cry. I don't remember much else about what happened because I got all choked up myself and we hugged each other for a long time. I just remember feeling good about giving her the gift, and helping to make up for what was turning out to be a lousy Christmas for one of my favorite people.

This simple little clay pot and a collection of items for someone who likes gardening (and Jägermeister shots) made the biggest impact I'd ever seen. To me, that's the spirit of Christmas: Giving for the sheer joy of giving. And in return, I got so much more back.

.

Did you like this post?
How about subscribing
in a reader or by email? It's quick and easy.
.

December 23, 2008

Tuesday Tip: Heirloom Christmas Tree Ornaments

We have a thirteen year old at home who eventually will move out and set up her own Christmas tree in her own home. My own tree has several ornaments I got on trips or as gifts from dear friends, and they're all part of my own heirloom Christmas tree ornaments. Even the plastic Santa selling ice cream cones that I got on a road trip to Florida is one of my heirlooms, not because of the quality, but because of the memories surrounding it.
When my kiddo was a teeny baby, I knew she would need some of her own ornaments when she set up her very first Christmas tree (she can't have my plastic ice cream selling Santa), and so we started a cherished family tradition that she loves.
This is today's Tuesday Tip: start a collection of future Christmas or holiday heirlooms for your children to have when they set up their own homes.


On her first Christmas, she was a 2 month old preemie, only about 4 pounds, and still dwarfed by her preemie jammies. One of this tiny baby's gifts was an ornament that showed a teeny tiny baby teddy bear and the words "Baby's First Christmas."
Every year since, Santa has given her one or more ornaments that represent something significant from that year. By the time she sets up her first Christmas tree in her own place, she'll have a collection of heirloom ornaments to place on the tree. Each one will have a story that she can eventually tell to her kids and grandkids.

The pictures in this post are borrowed from flickr users, but Rachel's ornaments include:

A pelican from when her dad lived and worked 90 miles from home (boy did we miss him!) right on the beach at a restaurant called The Pelican Pub. We loved visiting him and climbing the big 300 foot tall sand dune just yards from the pub.

A sewing machine - when she was in third grade, her class sewed aprons as a class project. She was especially proud of hers and I still wear it when making cookies.

A truck - a few summers ago she visited G-ma and G-pa on the farm in Wisconsin. She was only 10 but that summer she learned how to drive the old farm truck. (In the field.) Later, when she returned home, she offered to drive my car for me, since she already knew how to drive. Thank goodness logic prevailed and she understood "no license-no driving."

When she started playing the cello in orchestra my sister Tina came to the rescue with a cello ornament. G-ma Donna also sent a music stand ornament the same year.

This year things have changed a little with Christmas. She approached me and said, "Are you giving me another ornament this year?"
I told her, "Yes, of course Santa will give you another one."
She raised one eyebrow. (I wish I could do that!) "Yeah, whatever."
Before she could stick her ipod headphones back into her ears I quickly asked, "Do you want to pick one out or be surprised?"

She smiled. "I want to be surprised. I love the ornaments."

.
Did you like this post?
How about subscribing
in a reader or by email? It's quick and easy.
.

December 16, 2008

Tuesday Tip: Quick-n-Easy (and cute) Ribbon Organizers

I feel so clever... I put this together a few mornings ago when I was wrapping gifts before heading out to start my day. They're so darned cute I had to share. These are quick-n-easy ribbon organizers.
Didn't I tell you how much I love "Quick-n-Easy" ... and cheap? This is very cheap inexpensive. (Sorry, my bad.)

Gift boxes (cubes) come in packs of two
Originally uploaded by passitonplates

Here are my two ribbon organizers. I spent a grand total of $7 bucks for the set of nested boxes and 6 spools of ribbon (5 yards each). That's more than enough ribbon for all of this year's gifts... plus more.

Besides, aren't these cute?

Since I ship a Christmas box to the folks in Wisconsin, I need some kind of ribbon/bow that won't crush. I also am tired of the throwaway stuff and like the idea that Mom can re-use the ribbons next year when she sends stuff back our way.


Dollar store ribbon organizer
Originally uploaded by passitonplates


Each cube holds three spools
Originally uploaded by passitonplates

The 5 yard spools of ribbon (for $1 each!) fit perfectly in the gift box (cube). When the lid is on the box the ribbon pulls out easily but doesn't roll off the spool like crazy and get tangled... or in the way of the scissors and glue.

I'll have to pick up a few more sets of these boxes. These would be great to organize the ribbons I use to make Pretty Little Doo Dads. I need lots of eye candy in my studio to feel happy and inspired...

Know what I mean?

Don't forget to enter our Last Minute Gift Giveaway!

.

Did you like this post?
How about subscribing
in a reader or by email? It's quick and easy.
.

December 9, 2008

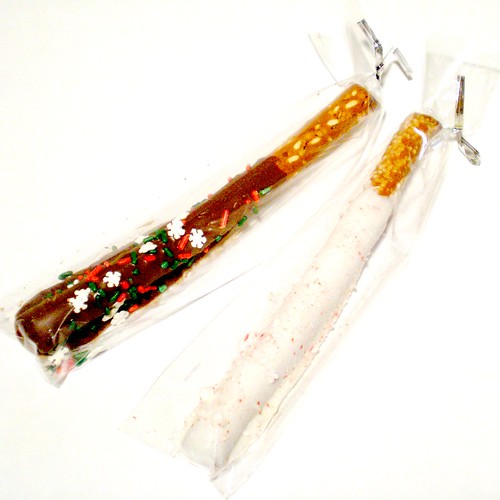
Tuesday Tip: Chocolate dipped pretzel sticks

This is a really neat gifty food idea I saw at a recent craft fair. I'm sorry I didn't get the name of the lady selling these because she had such cute ideas and I want to give her credit for this. Plus she was really nice and I thought she would be fun to hang out with.

These pretzel sticks would be a cute tie-in on any package, or a great stocking stuffer idea.

Ingredients:
24 Long pretzel sticks, the size of long cigars
2 c chocolate chips, andes candies, or any kind of chocolate melts
Baking decorations such as colored sugar, crushed candy canes, cookie sprinkles, etc

Instructions:
Line a cookie sheet with waxed paper and set aside in a cool area.

Place the chocolate chips or other meltable ingredient in a 2 cup glass measuring cup. Microwave on medium 30 seconds at a time, stirring between blasts, until smooth. Be careful to not overcook or it will burn, becoming hard and crumbly.

Tilt the measuring cup to the side and stick one pretzel stick in the melted chocolate. Twirl the pretzel to coat, then lift and allow it to drip. Place the pretzel on the waxed paper and sprinkle with baking decorations.

Reheat the chocolate as necessary, being careful not to burn it.

When completely cool, store in an airtight container or slide into food grade cellophane bags for gift giving.

Makes about 24


.
Did you like this post?
How about subscribing
in a reader or by email? It's quick and easy.
.

December 2, 2008

Your first Tuesday Tip: Tuesday Tips!


Today I want to introduce a new feature to the PIOP Blog - Tuesday Tips. Since Pass It On Plates involve gift giving and food and getting together with friends, I wanted to share some of the handy tips and ideas we've come across along our journey. Even if you don't use Pass It On Plates, you can use these tips.

Check back every Tuesday for a new handy tip that will save you time, save money, and/or save you a lot of extra work and stress when giving gifts or entertaining.
.
Did you like this post?
How about subscribing
in a reader or by email? It's quick and easy.
.
Powered By Blogger